A stairway gallery wall is one of the best places in a house for family photos. You walk past it every day, it fills a tall, awkward wall, and it turns a plain hallway into something personal.
It is also the photo wall that most often goes wrong. The frames climb in a wobbly line, bunch up near the ceiling, or sit so high you can't see them from the stairs. Even when every frame is perfectly level, the whole group can still look crooked.
The good news is that there is almost always one cause, and one simple fix. This guide walks through it, then shows you how to plan, measure and hang the wall, with layouts for three, four and a dozen frames.
Why stairway photo walls look crooked
On a flat wall, you hang pictures in relation to the floor. The floor is level, so the frames line up.
On a stair wall, the floor is not one line. It is a slope made of steps. If you measure every frame from the bottom of the stairs, or hang them all at the same height, the group ends up fighting the angle of the stairs. The eye reads that as crooked, even when the level says otherwise.
The fix is to stop hanging to the floor and start hanging to the stairs.
The rule: follow the handrail
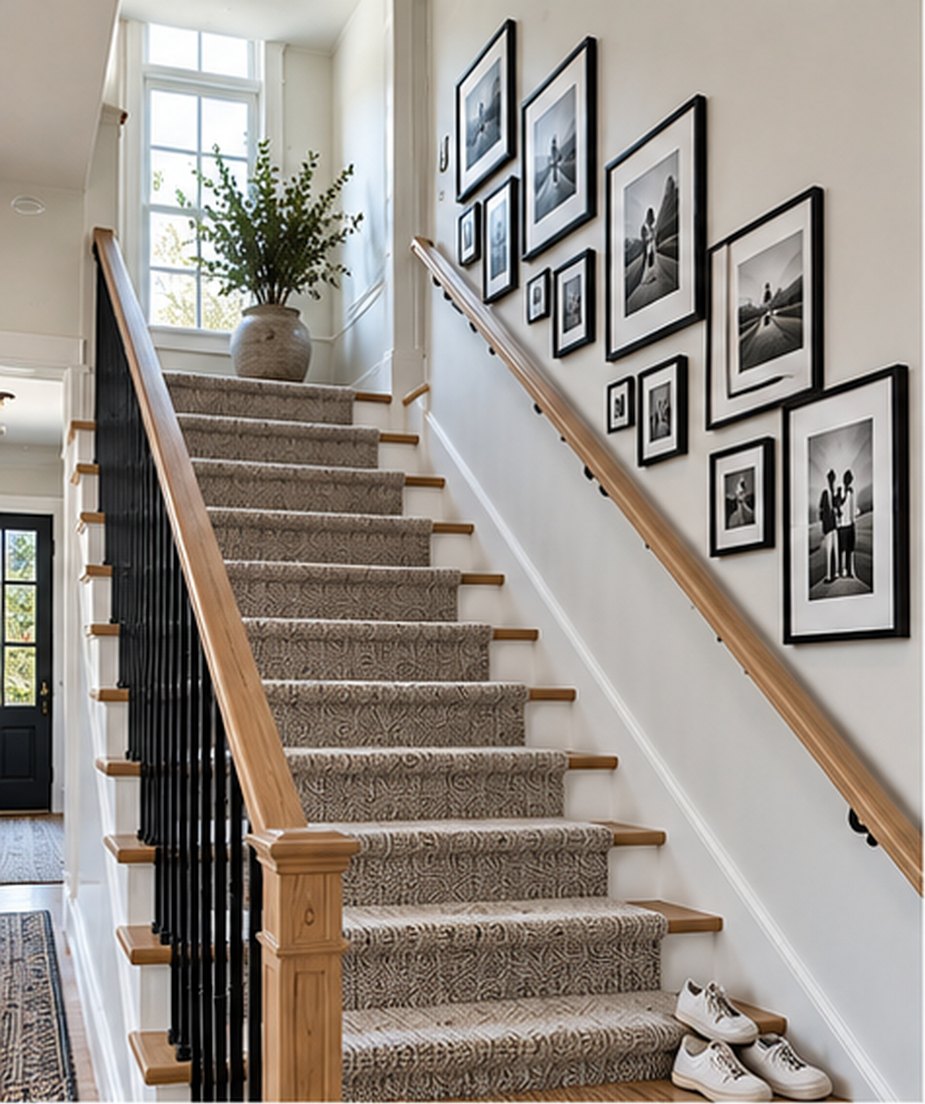
Look at the handrail. It already runs at exactly the angle of the stairs. That makes it the perfect guide.
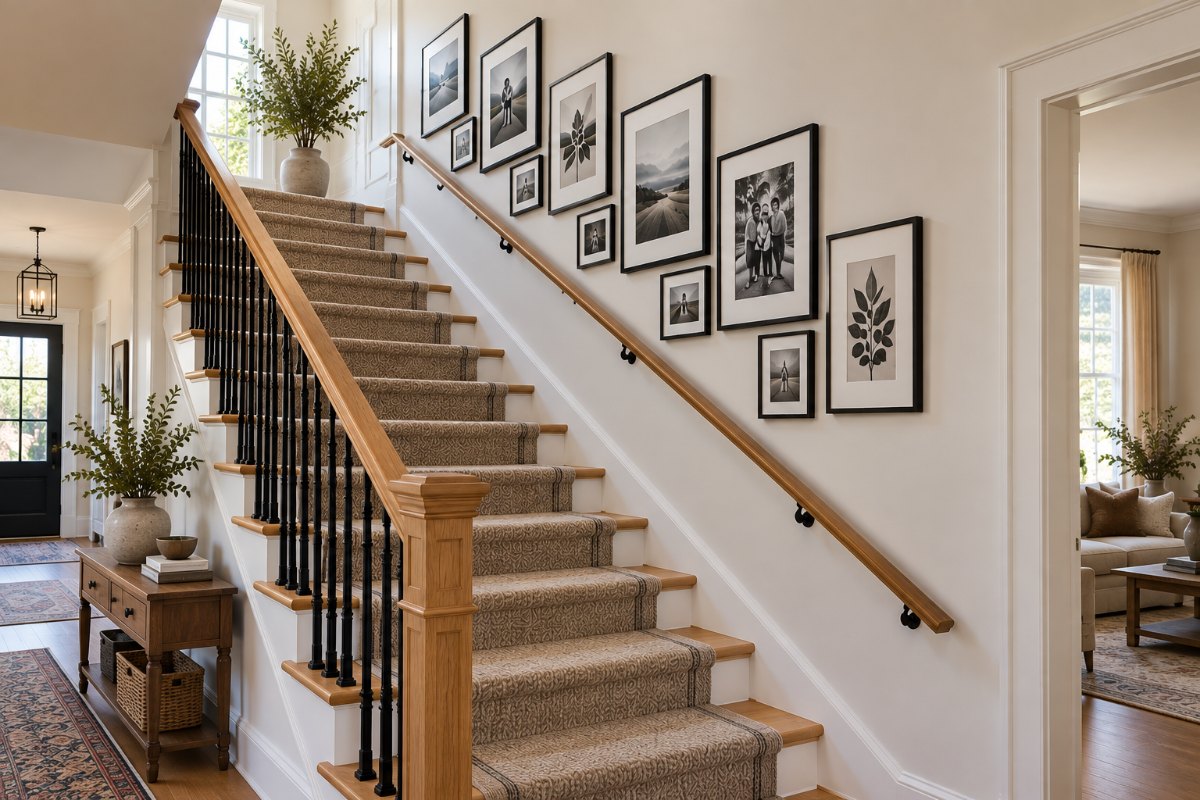
Every stairway gallery wall should sit in a band that runs parallel to the handrail. The bottom edge of the group follows the rail. The top edge follows the rail too. In between, the frames can be all the same size or mixed, but the band itself keeps the angle of the stairs.
A few things make this work:
- Every frame hangs level. The band is on a slope. The frames are not. Tilted frames are what really make a wall look crooked.
- The gap between the handrail and the lowest frames stays the same all the way up. About 8 to 12 inches is comfortable.
- The top edge follows the stairs too. Let the top row step up with the stairs instead of ending in a flat line. And leave breathing room above it: near the top of the flight, where the ceiling gets closer, one or two frames fewer often looks better than squeezing them in.
If your stairs have no wall handrail, use the line of the stair nosings (the front edges of the steps) instead. It runs at the same angle.
How high to hang pictures on stairs
On a flat wall, the usual rule is to hang art so its center sits about 57 to 60 inches from the floor. That is roughly eye level for most adults.
On stairs, use the same number, but measure from the step directly below each frame, not from the floor at the bottom.
- Stand on the step under where the frame will go.
- Measure 57 to 60 inches up the wall from the front edge of that step.
- Mark that point. It is the center of the frame.
- Move up a step or two and repeat for the next frame.
Because each measurement starts from a higher step, the centers climb at exactly the angle of the stairs. For a grid or a cluster, use this to set the center line of the whole group, then arrange the frames around it.
Plan it with paper templates first
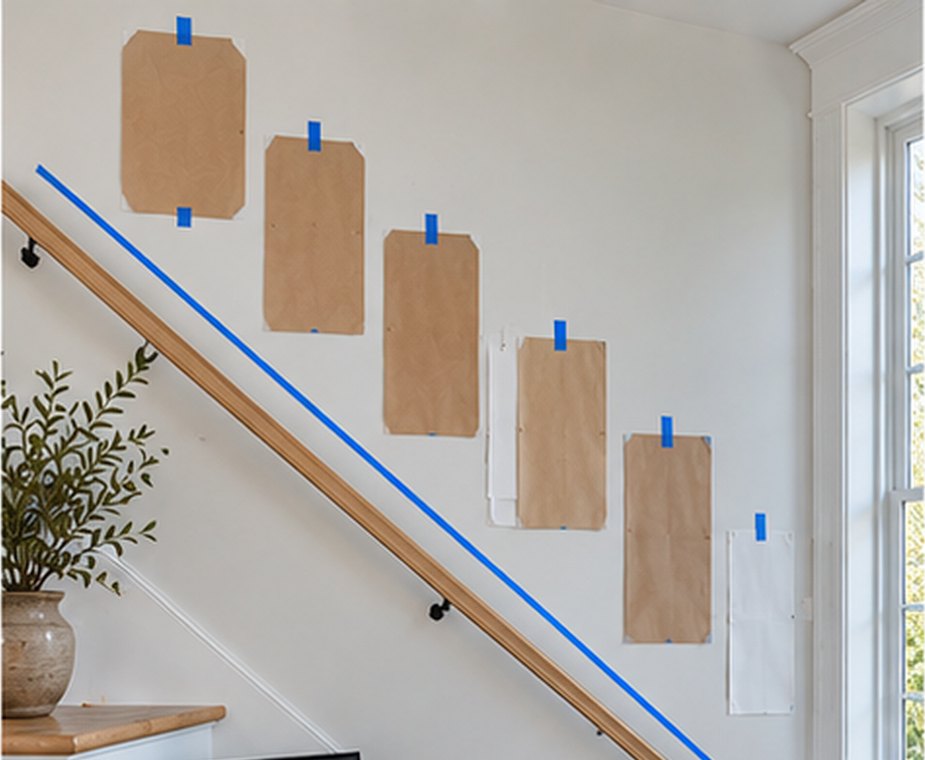
Drilling first and planning later is how walls end up full of extra holes. Paper templates take half an hour and save all of that.
1. Trace every frame. Lay each frame on kraft paper or old wrapping paper, trace it and cut it out. Write the frame size on each one.
2. Mark the hanging point. Turn the frame over, pull the wire or hook tight, and measure from the top of the frame to that point. Mark it on the template. This is where your nail or hook will go.
3. Tape a guide line. Run a long strip of painter's tape along the wall, parallel to the handrail, about 8 to 12 inches above it. This is the bottom edge of your band. A laser level set to the stair angle makes this quicker, but a tape measure works fine: measure the same distance up from the rail at the bottom, middle and top, and join the marks.
4. Arrange the templates. Start with the biggest or most important frame near the middle of the stairs, then work outward. Keep the bottom edges on or just above the tape line.
5. Live with it for a day. Walk up and down the stairs. Look at it from the bottom, the top and the hallway. Move a template or two. It is much easier to move paper than to patch drywall.
6. Drill through the paper. When you are happy, put your nail or hook right through the mark on each template, then tear the paper away.
Keep the spacing the same
The fastest way to make a gallery wall look finished is equal spacing.
- Use a gap of 2 to 3 inches between every frame, all the way up.
- Cut a spacer from a scrap of cardboard or wood at that width and use it between every pair of frames while you hang them.
- Line up edges where you can. In a grid, the tops of each row and the sides of each column should line up. In a looser cluster, try to line up at least one edge of each frame with its neighbor.
How to hang 3 pictures on stairs
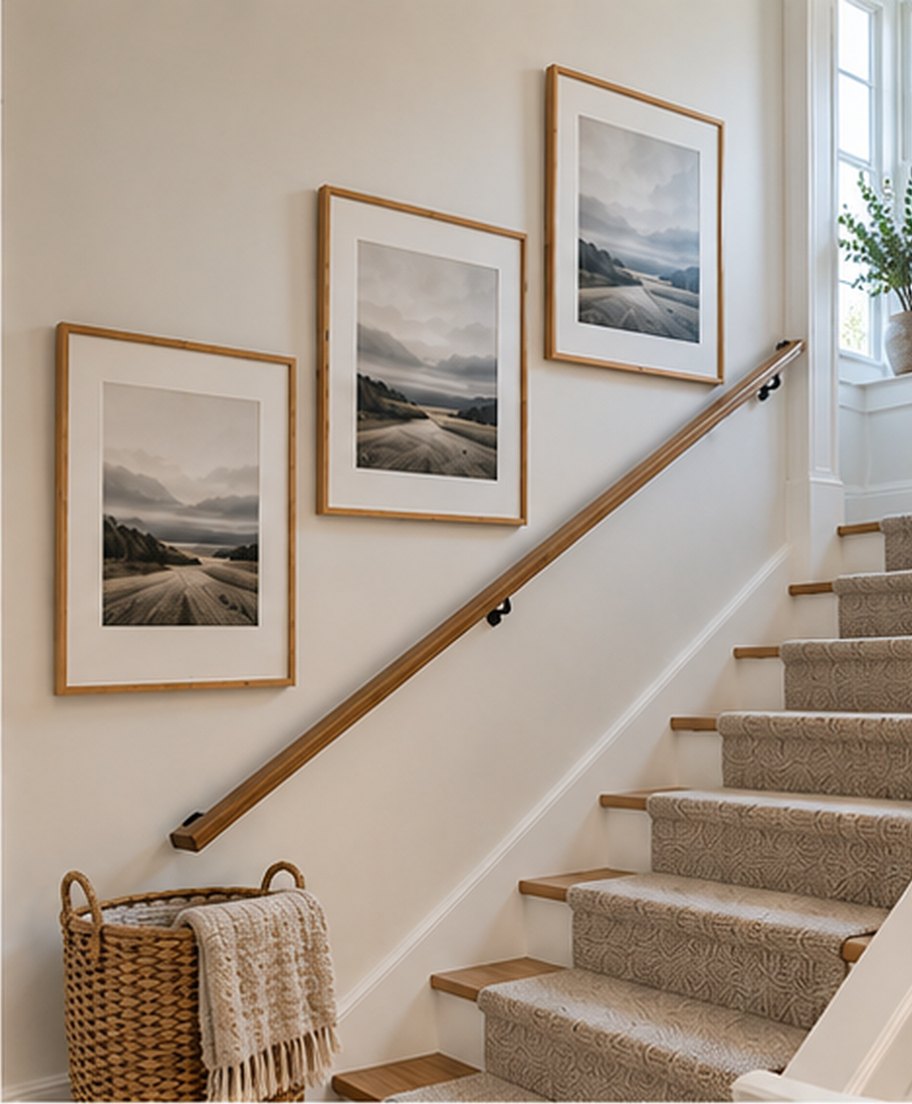
Three frames is the easiest stairway layout, and one of the best looking.
- Use matching frames. Three frames of the same size and color look calm and deliberate. Large frames, around 16 x 20 inches or bigger, suit a tall stair wall.
- Center each frame over its own step. Pick three steps spread evenly along the flight, for example the third, sixth and ninth.
- Measure 57 to 60 inches up from each of those steps to find each frame's center.
- Keep the gaps equal. If the steps you chose are evenly spaced, the frames will be too.
The result is a clean diagonal that climbs with the stairs, like the three landscapes above.
How to hang 4 pictures on stairs
With four frames, you have two good options.
A single stepped row. Hang four matching frames in a line, each one centered over its own step, just like the three-frame layout. This works best on a long, straight flight.
A stepped two-by-two block. Hang four matching square frames, such as 12 x 12 or 16 x 16 inches, as two columns of two. Then raise the upper column by the height of one or two steps, so the block climbs with the stairs. Keep every frame level and the gaps equal.
Matching square frames also work well with stick-on photo tiles, such as Mixtiles, which a lot of people use for stair walls because they are light and easy to move.
Five stairway gallery wall layouts
1. The diagonal band. Eight to twelve frames of mixed sizes, arranged in a band that runs parallel to the handrail. This is the classic family photo wall, and the picture at the top of this post shows it.
2. The stepped single row. Three to six matching frames in one line, each centered over its own step. Simple, calm and very hard to get wrong.
3. The stepped grid. Matching frames in two or three rows, with each column raised to follow the stairs. It looks tidy and modern, especially in black frames.
4. The salon wall on the landing. If your stairs turn at a landing, that flat wall is the perfect place for a fuller, looser cluster. Here you can hang to the floor of the landing as normal, then lead up to it with a few frames on the stairs.
5. One big piece. Sometimes one large piece of art or a single oversized family photo, centered on the stair wall, does more than a dozen small frames.
Frame sizes, colors and photos
Mix sizes with a plan. In a cluster, start with one or two large anchor frames (around 16 x 20 or 18 x 24 inches), then add medium (11 x 14) and small (8 x 10) frames around them. Put the largest frames near the middle of the stairs, not at the ends.
Keep the frames in one or two finishes. All black frames, as in the picture at the top, look crisp and modern. Black mixed with natural oak, as in the lighting example below, feels a little warmer. More than two finishes starts to look busy.
Use wide white mats. A mat gives every photo a bit of space, and it makes small or phone-quality photos look more finished.
Make the photos match. Printing everything in black and white is the simplest way to make a family photo wall look like a set, even when the photos came from different years, cameras and phones.
Lighting a stairway gallery wall
Stair walls are often dim, especially in the evening. Light turns the wall into a feature.
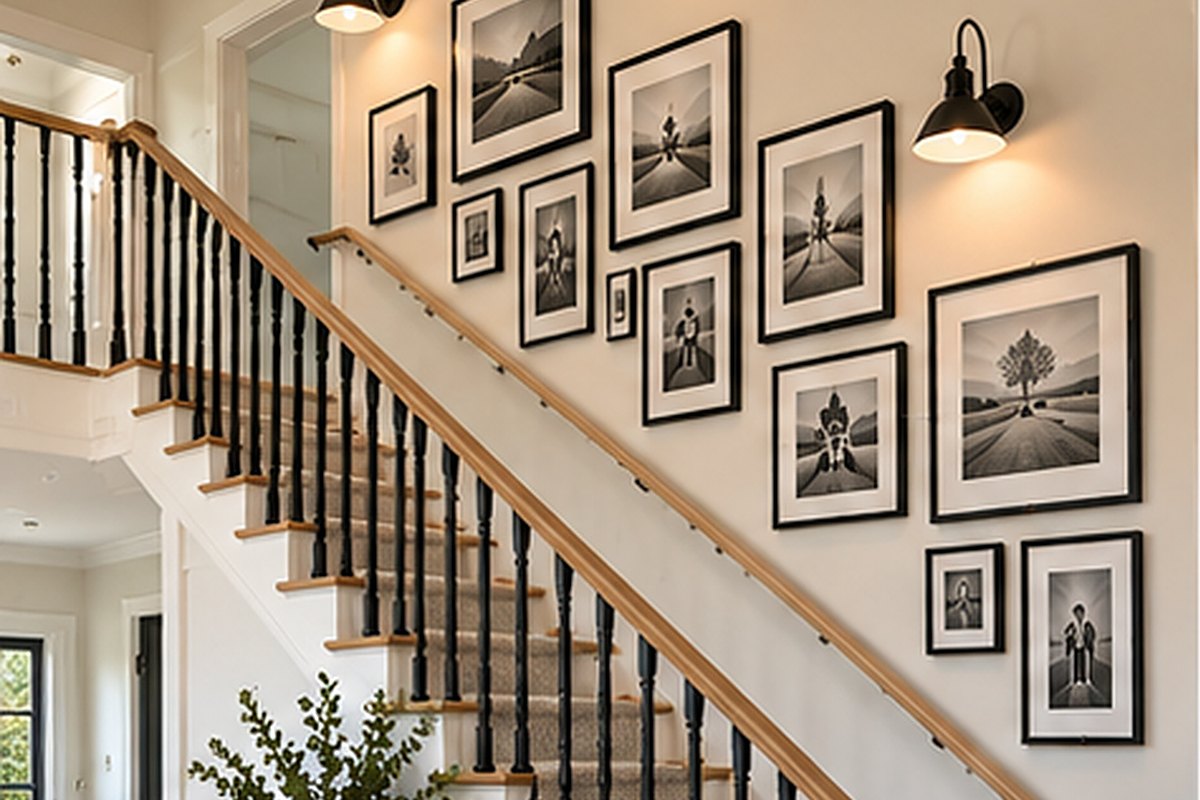
- Plug-in wall sconces, like the black ones above, are the easiest option. Hang one at each end of the group and hide the cord with a paintable cord cover.
- Hardwired sconces look cleaner but need a licensed electrician.
- Picture lights above a few larger frames add a gallery feel.
- Warm white bulbs (around 2700K) look softest against white mats.
Safety on the stairs
A gallery wall on stairs needs a little more care than one in a living room.
- Use acrylic instead of glass in frames near the handrail, or anywhere someone could bump them on the way down.
- Use two hooks per frame on anything larger than 11 x 14. Two hooks keep the frame level and stop it swinging.
- Find the studs, or use proper anchors, for heavy frames.
- Add small felt or rubber bumpers to the back corners. They stop frames sliding out of level as people brush past.
- Keep the handrail clear. Leave enough space above the rail that nobody's hand catches a frame.
Common mistakes
Hanging to the floor. Measure from the step below each frame, not from the bottom of the stairs.
Tilting the frames to match the stairs. The group follows the slope. The frames stay level.
Crowding the ceiling. If the top frames are within a few inches of the ceiling, the whole wall looks squashed. Lower the band or remove a frame.
Uneven gaps. Use a spacer.
Starting at one end. Start in the middle with your biggest frame and work outward, so the group stays balanced.
Stairway gallery wall FAQ
How high should pictures be hung on a staircase?
Hang each frame so its center is 57 to 60 inches above the front edge of the step directly below it. This keeps every frame at eye level as you walk up.
How do you make a staircase gallery wall look straight?
Arrange the frames in a band that runs parallel to the handrail, keep every frame level, and use the same gap between all of them.
What size frames work best on a stair wall?
Large frames, around 16 x 20 inches, for a simple row of three or four. For a cluster, mix one or two large anchors with 11 x 14 and 8 x 10 frames.
How far apart should frames be on a stairway gallery wall?
About 2 to 3 inches. What matters most is keeping the same gap everywhere.
Should a staircase gallery wall follow the stairs or the ceiling?
Follow the stairs. The ceiling is flat, but the stairs aren't, and your eye reads the wall against the steps and the handrail.
Related reading
Start with paper, a roll of painter's tape and your favorite photos. Once the layout follows the stairs, the wall will look straight from every step.